Pages

Friday, March 9, 2012

Outlook 2010 AddIn - Create new meeting request and mails programmatically

Few days back , questioned was thrown at me like - hey dude , have you ever tried extending ribbon in outlook? and my answer at that point was 'No'. then next question was - is it possible to have some buttons in the ribbon which will allow you to create new meeting request and mails with predefined data and recipients?

Question did sound interesting to me , and that immediately taken me in front of machine. I opened up VS 2010 to see what can be done.
It is easy to extend ribbon of Office applications using VS 2010 , as it gives you the project template.
I will not cover up how to create new ribbon and add buttons on it but here is what I learned on that evening - how to create new meeting request and new mails with predefined contents.
Just added two buttons on my custom ribbon , and added code behind of custom ribbon and buttons


private Application m_outlookApp;
private Explorer m_outlookActiveWindow;

  • To create new mail programmatically
 
try
{
    m_outlookApp = Globals.ThisAddIn.Application;
    m_outlookActiveWindow = m_outlookApp.ActiveExplorer();

    MailItem mailItem = m_outlookApp.CreateItem(OlItemType.olMailItem) as MailItem;

    if (mailItem != null)
    {
       mailItem.Body = "Add Your Contents Here..";
       mailItem.Subject = "Add Appointment Subject Here..";
       mailItem.To = "target.user@smtp.com";
       mailItem.Save();
       mailItem.Display(true);
       Marshal.ReleaseComObject(mailItem);
    }
 }
 catch (System.Exception ex)
 {
       System.Windows.Forms.MessageBox.Show("Error: " + ex.Message);
 }

  • To create new meeting request programmatically


try
{
   m_outlookApp = Globals.ThisAddIn.Application;
   m_outlookActiveWindow = m_outlookApp.ActiveExplorer();

   AppointmentItem appItem = m_outlookApp.CreateItem(OlItemType.olAppointmentItem) as AppointmentItem;

   if (appItem != null)
   {
     appItem.Body = "Add Your Contents Here..";
     appItem.Subject = "Add Appointment Subject Here..";
     appItem.RequiredAttendees = "target.user1@smtp.com;target.user2@smtp.com";
     appItem.OptionalAttendees = "optional.user1@smtp.com";
     appItem.Start = DateTime.Now.AddHours(1);
     appItem.End = DateTime.Now.AddHours(2);
     appItem.Save();
     appItem.Display(true);
     Marshal.ReleaseComObject(appItem);
   }
 }
 catch (System.Exception ex)
 {
     System.Windows.Forms.MessageBox.Show("Error: " + ex.Message);
 }


References:
http://blogs.msdn.com/b/mcsuksoldev/archive/2010/10/01/building-and-deploying-an-outlook-2010-add-in-part-1-of-2.aspx
http://www.add-in-express.com/creating-addins-blog/2011/11/04/outlook-create-appointment-item/
http://msdn.microsoft.com/en-us/library/bb612741.aspx


Working with custom user profile properties programmatically

This one is just to share how can we get the values of custom properties in user profiles in SharePoint 2010. actually this was the outcome of a quick POC while answering on MSDN SharePoint forums. so thought to share as this may help someone.

I have created a custom user profile property of type string and internal name is set to PrefferedColor while display name is - Preffered Color.
Then a simple web part which reads this custom user profile property.

All you need to do is Include references of following assemblies

Microsoft.Office.Server;
Microsoft.Office.Server.UserProfiles;


public class ShowPropertyWp : WebPart
{
  private string m_propertyInternalName = "PrefferedColor";
  private string m_propertyDisplayName = "Preffered Color";
  private string color;

  protected override void CreateChildControls()
  {
    try
    {
      Guid siteId = SPContext.Current.Site.ID;
      Guid webId = SPContext.Current.Web.ID;
      using (SPSite site = new SPSite(siteId))
      {
        SPServiceContext serviceContext = SPServiceContext.GetContext(site);
        UserProfileManager upm = new UserProfileManager(serviceContext);

        if (upm != null)
        {

             UserProfile up = upm.GetUserProfile("domain\\user");
             if (up != null)
             {
                color = up[m_propertyInternalName].Value.ToString();

                color = up[m_propertyDisplayName].Value.ToString(); // This will give an error.
             }


         }
      }

      if (!string.IsNullOrEmpty(color))
      {
         this.Controls.Add(new LiteralControl("You Have Preffered Color - " + color));
      }
      else
      {
         this.Controls.Add(new LiteralControl("You have not selected any preffered color"));
   }
  }
  catch (Exception ex)
  {
     this.Controls.Add(new LiteralControl("Error: " + ex.Message));
  }
 }
}


Tuesday, March 6, 2012

Visual Studio 2011 Beta - Creating Site Definition

This is just to quickly share some views on how to create a custom site definition using Visual Studio 2011 Beta.

This is a great enhancement for someone like me who really remembered all XML tags which are in Onet.xml / Site Definition. Now you dont have to do this manually at all , just create a solution and add new site definition in it using UI. How ? here is the answer.

I have created a sample solution using VS 2011 beta and adding new SharePoint site definition to it.


I have just added a new site definition to the project and given name as TestSiteDefinition.

Once you are done with these clicks , take a look at the solution explorer and see which are the files which are added. VS adds all files related to site definition like Onet.xml , webtemp_*.xml and a default page automatically , which we used to write and add manually for MOSS 2007 and SharePoint 2010 using previous versions of VS.


Lets take a look at each file -

1. default.aspx - This is a standard SharePoint page with default.master as master page and has only   twocontent controls on it which refers to the PlaceHolders from maste page - one is PlaceHolderPageTitle and other is PlaceHolderMain. You can now edit the file and add your customizations on it.

2. Onet.xml - This file contains all elements like Project, NavBars,Configuration and Modules. By default no feature is added in the SiteFeatures and WebFeatures elements of default configuration ID 0 , and a module is added whcih points to the default.aspx page. but wondering why ListTemplates and DocumentTemplate elements are missing here.
You can read more on onet.xml here

3. webtemp_TestSiteDefinition.xml - This file contains Template element. custom template is given ID of 10000 by default and display category is SharePoint Customizations by default.

Now I will just right click the solution and deploy this custom site definition and see what happens - and here is the output


Conclusion : Now with the new version of VS it is much easy to create site definitions and get started with your customizations.

Monday, March 5, 2012

Visual Studio 2011 Beta - What's new for SharePoint 2010

Now here it comes ,  It's 00:20 AM and I just installed VS 2011 beta version on my SP Virtual machine. I know that this is bit late to install this beta since MS has released it quite few days back , but I believe in better late than never so posting this just to share some thoughts on whats new available in beta for SharePoint developers.

Before going forward I would like to make a point here - I really liked the installation screen while installing VS 2011 , thought it took more than 30 minutes but doesn't matter. you can also try to see the innovative (because I seen this first time while installing any MS product) installation UI. you can download the beta copy of VS 2011 at this - http://www.microsoft.com/visualstudio/11/en-us

What's new for SharePoint?

Here is the screenshot which shows you the list of available items while adding to SharePoint 2010 project type


As you can see in image above , there are few options which are new in VS 2011 beta.

No More pain to work with schema.xml of list definition

Lets see the option to create List using new option.
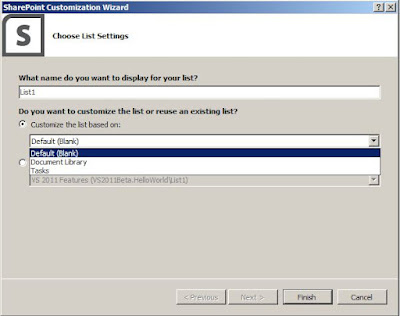
When you select the list option and select add - VS  2011 gives you the screen to select the template for your list , by default it gives you to choose from the default blank list , document library and task list template.
However it also gives you control to reuse the existing list templates which are already present on your target site. (the site to which you will be deploying the solution).


Next , after selecting the list template and display name of your list , click finish and here comes the interesting part.

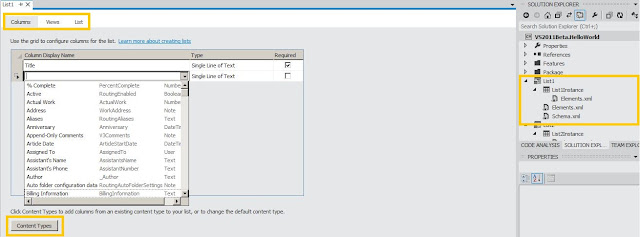
Thought VS adds the same structure in the solution explorer like we used to see in VS 2010 , the List Definition XML , List Instance and a feature to package and deploy this as single unit , but now with VS 2011 there is significant improvement in the rendering of complex structure of List Definition's schema.xml , VS 2011 shows you in well formatted UI where you can really play around adding new list columns , adding and setting default content types of list as well as work efficiently with list views.


As you can in the Image above , there is systematic way to display the columns , views and list. in columns tab you can see the available list columns and here you can add the list columns directly just with the help of few clicks , there is also a content type button defined where you can associate various content types with the list , like -


Now in the Views section - you can define the views as well as view settings in UI like


and finally in the list tab you can play around list instance's properties like List URL  , List description like -


and you are done , just right click the solution and deploy , you will have your list created with all defined settings.

In part 2 of this post , will explore some more new features.