Pages

Sunday, March 10, 2019

Building Proactive Messaging Bot using Bot framework SDK v4

I have been working with recently released bot framework from last few weeks and one of the interesting requirements I came across was to build a proactive bot which can send messages to users on its own.

Now this sounds like a very straight forward and quite common requirement as possibility of having this capability in bots opens a gateway to number of opportunities in an enterprise environment e.g. sharing live information analytics to power users, sharing caution / warnings to system administrators based on past data etc. however there is a serious limited documentation available on achieving these real-world scenarios specifically with Bot framework SDK v4.

In this post, I am going to share the experience I had while developing a proactive bot and challenges which I faced, approach I took by referring several links and will also share what I learned.

Hitting the road block


To start with, at the time of writing this article - the only documentation and an official sample available from Microsoft is as mentioned below. Please go through these links and understand the essentials involved in getting a proactive bot design working.

Coming back to the original requirement we had which was inline with what MSDN documentation says i.e.
"If the user has previously asked the bot to monitor the price of a product, the bot can alert the user if the price of the product has dropped by 20%"
But the big question was - how exactly do you do that?

Understanding basics


Now to understand this, lets get into the technical details and understand what it essentially means to send a proactive message to the end user from bot perspective.

Proactive conversation is nothing but the event or a message that bot sends to the user and there is one fundamental need here that the user should have at least initiated a conversation with the bot first else it does not make sense that users starts receiving messages from bot which they do not know! 

Now coming to the next point – as we know that overall bot framework is built around the idea of web api and is stateless, hence all the conversations or dialogs or messages which we send to the bot are essentially listened by one web api endpoint (if you have noticed, there is always this default route and an endpoint https://localhost:1234/api/messages) – whenever this api receives any message – it is then processed and response is sent back to the user via specific channel. (channel is just a medium using which user is talking to the bot e.g. teams, direct line or skype). 

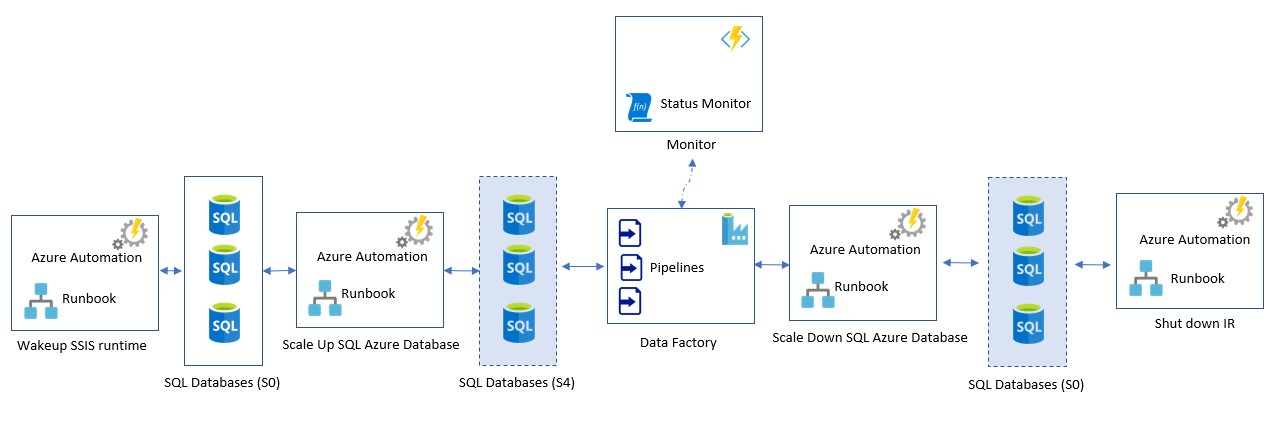
The requirement which I was working with needed some trigger from external system to the bot endpoint so that bot can process the incoming signal and then send out a conversation to a specific user.

Let’s understand this using a quick diagram


Note that - to send the conversation proactively to the user – the bot MUST know who the user is and what is his / her conversation reference otherwise it won’t be able to initiate the conversation with the user. 

Approach


Content below is heavily inspired by this github thread and a big shout out to all the contributors on that thread – you guys are awesome!

Bringing it all together:


These are the basic steps we integrated to get the proactive messaging working
  • Record conversation reference of each user / desired users
  • Used Azure table storage to store these records 
  • Introduce api to fetch stored record from storage and generate ProactiveMessage
  • Introduce / Integrate ProactiveController from this post
  • Trigger post call to ProactiveController’s method with payload generated from step 3 and send a message from bot to a specified user
Let’s see each step-in detail

Step 1 and 2:


Because the pre-requisite is bot should know the conversation reference before it can send the message by its own, it becomes essential to have the conversation references stored somewhere.

Since we do not really need a relational data structure here, so we can store it azure table storage, but you can choose to store in relational database table too. 

How do we store?

We can either write a custom middleware and detect if the entry for the user exists in the underlying storage, if it does not – meaning it is a new conversation and we record it. one big problem with this approach could be – since it is a middleware – it would be invoked every time for each message and might impact performance. 

Thankfully, in our bot since we have integrated Azure AD authentication – we knew exact place where we can write this storing logic i.e. whenever user gets authenticated. 

This is how my UserEntity look which I am storing in the table storage


Instance of this class needs to be initiated from the incoming first user request which you would find in the OnTurnAsync method


Step 3:


Because we have now stored the user entity (conversation reference) in the table storage – we will now need the api which can query the storage based on inputs provided.

E.g. if I am storing user name in FromId property, then I would need the api to generate Activity Payload for that specific user so that we can send it further to the ProactiveController which takes care of beginning the proactive conversation with that user.

I have added a controller in the same bot project which returns the collection of ProactiveMessages
Here my definition of ProactiveMessage


And ActivityGeneratorController in short


And here is the sample output it generates


IMPORTANT NOTE:
This took a while for me to understand and hence sharing. The botId and needs to be the Microsoft App Id of your bot and then only it works.

Step 4 and 5:


Finally, you should integrate the ProacticeController in your bot project. 
I am not going to share that source code here again because there is already a git project for it.

Validation:


Once this set up is completed, and if you have managed to generate the activity payload correctly by recording correct user conversation references, you can try sending the HttpPost request to the ProactiveController externally from any request generator like Postman and you should see the proactive message with your text appear in conversation of the user to which it was sent. Note that in above Json example, the message with text “Test Message “will appear in user’s team channel.

Update


The approach mentioned above stopped working in specific scenarios e.g. when the user to which message needs to be sent becomes idle on channel then proactive messaging started throwing exception below

Microsoft.Bot.Schema.ErrorResponseException: Operation returned an invalid status code 'Unauthorized'
   at Microsoft.Bot.Connector.Conversations.ReplyToActivityWithHttpMessagesAsync(String conversationId, String activityId, Activity activity, Dictionary`2 customHeaders, CancellationToken cancellationToken)
   at Microsoft.Bot.Connector.ConversationsExtensions.ReplyToActivityAsync(IConversations operations, String conversationId, String activityId, Activity activity, CancellationToken cancellationToken)
   at Microsoft.Bot.Builder.BotFrameworkAdapter.SendActivitiesAsync(ITurnContext turnContext, Activity[] activities, CancellationToken cancellationToken)
   at Microsoft.Bot.Builder.TurnContext.<>c__DisplayClass22_0.<<SendActivitiesAsync>g__SendActivitiesThroughAdapter|1>d.MoveNext()

and this puzzled us, again there is a lack of documentation and information is scattered around different links and blogs. We came across one helpful link which gave some hints and then we had to make changes in out ProactiveMessagingController logic which now looks like this


Note that we are now creating channel account and initialing an instance of MicrosoftAppCredentials with bot's app Id and secret (typically you would find this in .bot file in your solution, if not you can always get it from bot registration portal) and then with the help of ConnectorClient we are not beginning conversations with specific user.

Hope this helps someone looking to build the proactive messaging using bot framework SDK v4 and with this one can trigger targeted proactive messages externally to specific user with notifying them with relevant message.

Saturday, March 2, 2019

Implementing database per tenant strategy in bots using Azure bot services and SDK v4

Recently I have been working with building the bot with latest bot framework SDK i.e. v4 and the aim was to provision the bot as a SaaS. Meaning that, we already had dedicated SQL Azure database instances provisioned for each tenant (which are also consumed by other line of business applications) and there was need to create the bot which will be hosted with Azure bot service and authenticated by Azure Active Directory. Whenever user logs in to the bot, based on the identity of logged in user the bot should dynamically redirect all the subsequent data read and write requests to correct SQL Azure database instance of the user.

This article does not focus on writing an end to end bot covering scenario above (but can be a good candidate for later) and makes some assumptions that you already have some knowledge of latest bot framework and are familiar with fundamentals of it along with .NET core and Entity Framework core. If you are new to it, then it is highly recommended that you go through documentation here and then continue reading the further part of this article.

The basic architecture and overall Eco-system looks like this


Note that the sole purpose of sharing the above diagram is to give you a high-level overview of the solution and to make you aware that where exactly bot service is coming in to the picture. You can choose to ignore the data preparation and reporting part which is at the right and involves ADF and Power BI.

To keep the content of this article focused on our scenario, we will not go in to the details of how bot can be configured to use Azure AD for authentication and blob storage for state management etc. You can find the documentation to do it on this and this link.

One quick point to mention here is, the Azure AD app needs to be configured as multi-tenant app so that users from different active directories would be able to get themselves authenticated.

Now coming back to the problem of redirecting requests to right tenant based on the user identity, let’s see how that can be done.

Typically, when we want to use the EF data context object inside the ASPNET core application, we end up taking help of DI and inject it in Startup.cs which looks something like this


But this does not help here, Why? Is because at the time of the application startup – you do not know which database we want to point to.

DbContext object should be initialized at the run time once we know that who is the user and where is the relevant database for that user.

Now, to know where to send data request of users – we need to have some sort of mapping present between users logging in to bot and respective database connection strings. This mapping can be done in number of ways e.g. maintain mapping of user’s domain and connection strings or maintain mapping of user’s tenant id and connection strings.

You can choose your own store to have these mappings provisioned i.e. store it either on central SQL azure database table or maintain it in XML, JSON or in configurations or in Azure key vault.

There is an excellent documentation available by Gunnar Peipman explaining this scenario, you can have a look at it to understand the details of how it uses json file to initialize different mappings

So functional flow looks like this


Runtime Initialization of the DbContext object can be easily achieved by overriding OnConfiguring method of the DbContext class.


With this approach, there is not really a necessity to inject the DbContext at the time of application startup and instead you can initialize DbContext explicitly whenever you need. Note that every time you request or create your DbContext object – the OnConfiguring method will be called.

Extending the model


How do I get the connection string at the run time?

The answer is, you can create your own connection string provider which will return you connection string based on user and will look up relevant connection string either in Sql database, or in configuration or in azure key vault.

For our specific scenario, since our bot is AD authenticated – once the user is logged on, we know the tenant id of the user. We store that tenant id in custom class i.e. UserProfile and store it in the bot user state so that it can be accessed during any conversation.

As a mapping between tenant id of the user and actual connection string, we do use the Azure key vault to store connection string value as a secret. You can refer how to configure azure key vault connected services aspnet core in this article - Add Key Vault to your web application by using Visual Studio Connected Services

The reason tenant connection string provider comes handy when tomorrow you decide to maintain mappings in some external secure service other than key vault in that case all you would need to do is, replace the implementation of tenant provider and that’ll be all.

Here is how tenant connection string provider can look (fetching connection strings from Azure key vault)


Introducing DbContextFactory


It always is a good approach to introduce the factory pattern to achieve the additional isolation between the requester and object creator.


Note that how we have created our own implementation of CreateDbContext method instead of implementing the default method which only takes string array as input.

Also note that how we have consumed the ConfigurationTenantProvider which implements TenantProvider’s GetTenant method and is configurable. We could have injected the ITenantProvider in factory but for this example, just wanted to keep the setup simple and hence initialized it directly.

Let’s understand it with the help of a block diagram


Startup configurations


The last part would be to make DbContextFactory available to all the dialogs i.e. by injecting it to the container.


and since we now have registered the DbContextFactory to the DI container, you should easily be able to access it in any bot dialog and should be able to create your DbContext dynamically whenever needed.


Summary


The latest bot framework and EF core is quite flexible, approach explained above is one the way to make your db context dynamic and there could be multiple ways to do the same. Readers are encouraged to refer it as an option and customize it further as per their needs.


Sunday, August 19, 2018

Cost effective way of running Azure Data Factory Pipelines with Integration Runtime

Azure data factory is an online data integration service which can create, schedule and manage your data integrations at scale.

Recently I was working with ADF and was using it for transforming the data from various sources using SSIS and hence ADF’s SSIS integration services became the core necessity to run my data factory pipelines.

When we speak of any cloud-based solution – the design part of it needs to be done diligently not only to ensure that you are using Azure scale optimally but also to make sure that you are consuming the scale only for the time when you need it, and this can essentially make an enormous impact on your overall operational cost.

We will only be speaking of ADF pipeline and SSIS runtime costs to keep the agenda short and to the point. This article assumes that you have basic understanding of Azure data factory and its integral components, if you are not familiar with it, then it is highly recommended that you should understand the essentials of it by visiting this documentation.

Our scenario was quite simple – we had some pipelines which were scheduled at time and once they are invoked, they further invoke SSIS series of execution of SSIS packages. Once all packages are finished executing, pipelines are said to be finished and that’s the end of the schedule for the day.

First and fore-most consideration which we have considered is, we turned on the SSIS integration runtime infrastructure of ADF right before the time when pipelines were scheduled and added some assumed duration e.g. 4 hours after which IR will be turned off. All of it is simply achieved using Azure automation service and a custom PS based workflows to turn on and off the IR scheduled at time.

So overall initial architecture looked like this


Now the interesting bit resides in SSIS packages part – when the series of packages are executed then they are the ones doing the hefty operations on the data and usually interact with some quite large tables. E.g. reading delta from those tables or merging data into them. The process can run from minutes to hours depending upon the data you are dealing with (e.g. reading delta from last week or last day etc.) and during this – we often used to hit the DTU threshold of underlying SQL databases. 

Note that hitting DTU threshold does not mean that your pipelines will fail, however the amount of time to finish them completely will increase and what does this mean? This means that for this entire duration of execution, your SSIS runtime needs to be turned ON and this will cost you money.

At the time of writing this, one node of SSIS runtime (1 core, 3.5 GB RAM) provisioned in North Europe data center costs you $ 0.5916 per hour, so even if I am running my pipelines daily which runs for that assumed 4 hours, I would be spending $71.1 per month. Remember, though this still sounds cheap and partial cost effective but there is a good chance to save few more bucks here for sure. 

Possible Solutions / Work-around?
  • Use of elastic databases?
This sounds good, however consider the scenario where you have 10 SQL databases, and all are resident of same elastic pool and data factory pipelines needs to be scheduled at same time and each database needs to have 50 DTUs at same time but you have only 100 reserved DTUs shared across all the databases so chances that you would still enter in the same situation i.e. hitting DTU threshold and again, you would be reserving 100 DTUs un-necessarily for all the time even when you will not really need it and hence the elastic pool went out of picture. 
  • Scale out SSIS runtime?
Sounds interesting again and should be a solution for number of other scenarios but not in our case. Why? Because at the end of the day – our SSIS packages were loading and unloading data directly on the SQL Azure database tables and it were the SQL Azure database’s DTU we were running out of and not the CPU or memory of underlying node which hosts your SSIS integration services, so this was not an option to go with. 

So Ideally, we wanted a solution which can leverage the scale of SQL Azure databases and Integration runtime together but at the same time it should be cost effective.  
And hence one possible solution we came up with which is quite straightforward and can easily be divided into below distinct sections
  1. Turn on the runtime right before pipelines start to run.
  2. Scale up underlying SQL Azure databases to higher tier e.g. S4
  3. Wait for scale operation to finish.
  4. Run the SSIS packages in IR.
  5. Scale down the SQL database to smallest tier e.g. S0
  6. Scan pipelines status before scheduler turns off the runtime.
Let’s see how it can easily be visualized


There could be multiple ways to achieve the steps mentioned above, however we chose to implement those using the easiest approach.

Step 1: It was already in place and was achieved using Azure automation so that remained unchanged and untouched. 

Step 2 and 5 is again achieved using Azure automation services, we have written a small PS workflow which can vertically scale up or down your databases. All we needed to do was invoke this automation workflow using a webhook which can be called from Azure data factory pipeline. I have already shared the workflow on TechNet gallery so feel free to check it here

Step 3 is achieved by making use of a small Azure function to whom you can ask the current tier of the input SQL azure database and then use the until (like while in C#) activity in your pipeline to wait till you get the desired tier. Again, the azure functions can be called directly from within your data factory pipeline (Using web activity).

We have used the Until activity in the pipeline to poll the status of database updated tier using the azure function.

Sharing the azure functions bit just for the demonstration purpose. Note that in order to make this function working - you should be creating Azure AD app and give it access to the Windows Azure Service Management Api


Also, ensure that the Azure AD app has got access to the resource group in your subscription containing your SQL azure databases.

We have used the Azure SQL management nuget to talk to management Api, you can refer it https://www.nuget.org/packages/Microsoft.Azure.Management.Sql.


Step 4 – a core activity which can invoke the SSIS package serial execution using a stored procedure. The core command can be checked at here

Step 6 - Comes the last step i.e. stopping the SSIS runtime node when you have no pipelines running. This again is achieved using Azure automation workflow which triggers itself in every 1 hour (this being minimum trigger frequency available at the time of writing this article) and scans your ADF pipeline’s run status of last 2 hours, if it does not see any running pipeline, it turns of the IR node. i.e. SSIS integration runtime. I have already shared the workflow here, so you can check it out there on TechNet gallery. 

You might have already noticed that we have mostly achieved everything either using Azure automation and using azure functions and might have figured the reason behind it too! Yes, the cost – Azure functions does offer you 10 million free executions each month and automation service too offer 500 minutes of process automation free each month. 

After implementing this approach, the run time for pipelines has been reduced significantly since SQL Azure database S4 tier offers you dedicated 200 DTUs. With this, one pipeline is getting finished almost within 15 minutes.

And finally, let’s look at the pipeline designer and understand how we have incorporated steps above 


Now, let’s do some basic math here and find out appx operational cost difference (skipping data read / write costs)

Previous model:
  • SQL database S0 - $0.48 per day
  • SSIS runtime up time (4 hours) - $2.347 per day
  • Per day operational cost appx $2.82, translates to $84.6 per month.
Updated model:
  • SQL database S4 for 1 hour per day – $0.40
  • SQL database S0 for rest of the day (23 hours) - $0.46
  • SSIS runtime for 1 hour per day - $0.59
  • Azure functions – None
  • Azure automation – None
  • Per day operational cost appx $1.45, translates to $43.5 per month. 
Numbers do indicate that the cost seem to have reduced significantly and have reduced it almost to half for each month. 

Hope this helps someone who is headed on the same path of running azure infrastructure and solutions in cost effective way. 

Saturday, June 23, 2018

Working around: "Failed to deploy the project. Try again later. Microsoft SQL Server, Error: 27118" in SSIS Deployment

Hey there, been a while that I have updated this blog but maybe this one notorious error inspired me to write one post and so here I am, sharing a short but an useful tip which could save someone's hours of efforts.

Background - Lately, have been working with Azure data factory for one of the customer who has large number of SSIS packages already well written, functioning and deployed on their on-premise live infrastructure, however now everything needs to be ported to Azure for obvious reasons of costing and minimizing the dependency on their on premise assets and make their way all the way through Capex to Opex and hence Azure data factory is the best fit for it. Now, quick approach to get all these existing SSIS packages running up there in the cloud is by making use of the SSIS runtime which enables you to run your existing packages in Azure and it is as easy as any lift and shift approach of deployment.

Long story short - Whenever you make any change in your SSIS package, the change needs to be published / deployed in your SSIS DB so that your next package run can pick it up. Visual studio or SSMS has in-built features to make sure that these changes are deployed smoothly in few clicks by making use of the deployment wizard but wait.. there is and always a but in everything which sounds too easy, isn't it?

Many times, whenever you try and deploy your packages using this deployment wizard e.g. either by using Visual Studio or SSMS - you might have encountered an infamous error message something like this, click on the failed option for details and you see mysterious message which says nothing but
"Failed to deploy the project. Try again later. (Microsoft SQL Server, Error: 27118)"
This leaves you in a confused state and you spend hours wondering where to look for an answer?


Well, there is always a friend in need and his name is Google / Bing. The developer community across the globe is generous enough to post their experiences troubleshooting this error and for some of you it could help and you are all set, however it did not help me in this instance!

Since error seems to quite common and workarounds mentioned in existing posts could help you out so make sure you also check out these fantastic links
Well, what worked for me then?

Two things - When nothing worked from all the suggestions mentioned on various blog posts - I went ahead and deleted the existing deployed project and tried re-deploying using same VS deployment wizard and voila - error went away and could manage to deploy fine, hold on - don't get excited yet, there is an incoming but here.. but.. the same error message started surfacing for upcoming deployments.
Again thought of deleting the existing deployment on SSISDB and tried to re-deploy - but it did not work again. 

From few links, could know about the stored procedure actually prepares your deployment before it is deployed, and so thought of taking a look at it. The name of this stored procedure is "[internal].[prepare_deploy]", you can find this stored procedure in your SSISDB.

Open this stored procedure and search for the error number shown in detail error message i.e.27118 and it points to one of the line from where exception is being thrown with this error number. 
The logic there is that, it searches for the project_id in one of the internal table named as "[internal].[projects]" and if finds it - then it throws an error. 

So, easy to guess what I did - went to the "[internal].[projects]" table in SSISDB, tried querying all the content of it by select * from [internal].[projects], could see that there is one entry sitting in this table which looked like was for the project I was trying to deploy - guess what, I simply deleted the entry from the table and tried re-deploying the project using same VS deployment wizard and again it started working. 

Hope this helps someone who is still facing the issue and clueless after trying out all the suggestions provided on other posts. 


Wednesday, September 21, 2016

Solving Error 403 forbidden after deploying MVC web applications in Azure VM

As you have reached here and reading through this post, it makes me assume that you are facing the same issue which I did and are looking for solution after trying multiple workarounds for the error i.e. Error 403: Forbidden whenever any MVC application is deployed on Azure Virtual Machine.

Based on the error title, it appears that this must have to do something with permissions to some resource in IIS but that is not the thing here and I came to know this only after spending significant amount of efforts behind this. Lesson learnt– Error message could be misleading.

Initial investigation lead me to multiple solutions and looking at the answer’s help count on different sites it appeared that mentioned solutions were working for other people, but why not for me?

As mentioned, there are multiple links you will get describing resolutions which worked for number of people below are few such links


What worked for me?

After trying all the possible solutions mentioned in the links I was still getting same error. Here is the thing which worked for me

I was simply missing few IIS settings which I did not do while enabling IIS role on my Azure VM (Note that I am using Windows Server 2012 R2)

All I needed to do is,

Open Server Manager on VM hosting my MVC web application

Click on Add roles and feature


Reach to the screen for selecting the role on this server and make sure you have enabled below two features along with other required features to enable IIS role.


Note that, I managed to solve this by enabling below checkboxes (as shown above)
  • ASP.NET 4.5
  • .NET Extensibility 4.5
And after completing the installation, the 403 Forbidden error was gone.

Thursday, September 1, 2016

Technet Azure Technical Guru Award - July 2016

Glad to share that I am awarded as Technet Azure Technical Guru for month of July 2016 for one of my Technet Wiki Article. You can take a look at it here - Azure Key Vault essentials for Beginners

You can take a look at detailed announcement here on Technet Wiki - TechNet Guru Competition July 2016 Results 
Technet Guru Competition : This is an official Microsoft TechNet recognition program, where people such as yourself can get the recognition they deserve for the time given to the community.
Each month, the contributions are scored by a panel of judges (5 per category, 2-3 in each are MS experts), and the winners of each category are showered with love and attention from all corners of TechNet. 

If you spend any amount of time crafting an awesome answer to a forum question, then why not get the most back for your efforts by posting it to TechNet Wiki?
Become MICROSOFT TECHNOLOGY GURU OF THE MONTH!

Saturday, August 20, 2016

TNWiki Article Spotlight – Azure key vault essentials for beginners

Glad to to know that one of my article on Azure key vault services has been selected as TNWiki Article Spotlight!


Take a look at the announcement here.